Pin It

Thursday, August 27, 2009

Slicer Tomatoes: A Slice of Heaven


Despite the cool weather and gossip of a tomato blight this summer , we have had much success with our heirloom slicer tomatoes. We've been juicing them, eating them as appetizers, putting them in salad, and giving them away like hotcakes to keep up. However, we're not looking forward to this stopping; we are quite enjoying ourselves. Moments of quiet and calm are few and far between as the school years picks up. Our tomatoes force us to take a step back and enjoy the outdoors and the remainder of summer.

When we choose tomato seeds, there are a few staples, including Aunt Ruby's German Green Tomato. These are large, beefsteak tomatoes. When they are soft to the touch, they're ready to be picked. We find the taste to be mellow and smooth with sweet accents.

Aunt Ruby's German Green Tomato


Another beefsteak staple is the Brandywine Tomato. Like the name implies, these are rose-colored. Also very large, these make a great slicer to be eaten alone. When we taste-tested all of our tomatoes to compare them last evening, we thought this one had the most intense tomato flavor.

Brandywine Tomato

A new variety that we tried this year, but will definitely become a staple is the Nyagous Tomato. These tomatoes have been blemish-free and perfectly round. They are a deep wine-red color and are very sweet, maybe even a bit smokey, in flavor. Yum!

Nyagous Tomato

Along the same lines as the Nyagous, is the Black from Tula Tomato. These tomatoes look very similar to the Nyagous, and if they were any smaller, they might be confused with the Nyagous. They're a Russian heirloom, meaning that they produce earlier because they have been bred to have a shorter growing season. Very complex flavor. It reminded us of a good wine!

Black from Tula Tomato

Our next tomato variety, we have nicknamed the Packer Tomato. It is the Green Zebra ~ green and yellow, this slightly smaller tomato packs a nice tangy punch! Very refreshing, especially on a hot summer day with a glass of white wine.

Green Zebra Tomato (aka Packer Tomato)

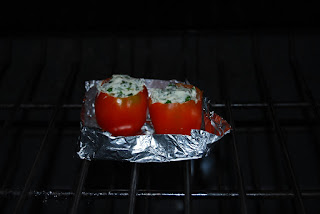
Our last variety, sure to become a staple in our garden, is the Striped Cavern. We bought this variety on a limb, but are so happy that we did. This tomato is perfect for stuffing. We've had quite an adventurous summer, stuffing these with whatever cheeses and herbs we have had available.


Striped Cavern


Cheese- Stuffed Striped Caverns


All of them!

Monday, August 17, 2009

Who is in the Mood for Bloody Marys?

Over the years, we have tried perfecting our Bloody Mary mix, both fresh and canned. Today, I believe we've made our best! We used a juicer to juice the ingredients. Then, we processed 2 quart jars in a water canner for 40 minutes to seal. Before we purchased a juicer, we followed the directions listed below the ingredients.

We had a cup more than two quarts, so we were forced to have a Bloody Mary today (darn!). It was wonderfully creamy and perfectly spicy! We hope we can keep our hands off of the jars until fall!

Pokey's Bloody
30 medium tomatoes, peeled and seeded.
2 green peppers
4-5 large carrots
1 small bunch of celery
1 small onion
4 garlic cloves
1/4 cup parsley
1 bay leaf
1/4 cup sugar
1/4 cup lemon juice
1.5 Tbs. salt
1 Tbs. Worcestershire sauce
hot sauce to taste

Chop all vegetables. Cook peppers, carrots, celery, onion, garlic cloves, parsley, and bay leaf in a large pot until veggies are soft, approximately 40 minutes. Take out the bay leaf. In batches, blend vegetable mixture in a food processor or blender. Strain to get out any seeds. Put all of the mixture back into the pot and add the sugar, lemon juice, salt, Worcestershire sauce, and hot sauce. Bring to a boil. Pack and seal in jars (40 minutes in a water canner).

Pickled Cherry Tomatoes


If you've been following our blog, you know that we ended up planting 30 tomato plants this year due to my new found plant empathy. Among the 30 tomato plants were 6 cherry tomato plants. Andy, of course, nearly had a nervous breakdown when he realized I intended to plant all 6 of them. As many people know, cherry tomato plants typically produce so many little red/yellow/orange bursts of heaven that their gardeners end up feeling as if they are in a multi-colored hell by the end of the season, trying to figure out what to do with the little buggers.

So far, this hasn't happened to us! Granted, we've gotten the suspected amount, but we've been keeping up with them quite well. Mostly, we've been eating them fresh as snacks, but a few days ago we collected quite a haul, so we decided canning was in order.

Among the cherry tomato plants that we planted is a tiny breed, smartly named the Gold Rush Currant Tomato. The fruit grows to a 1/4 to a 1/2-inch diameter. They have been especially plentiful and seemed the perfect fruit for pickling! We also canned one quart of the Riesentraube Tomato, which has also been a bountiful producer.

Pickled Cherry Tomatoes (makes about 2 quarts)
1 quart water
2 Tbs. kosher salt
1 lb. cherry tomatoes (firm, even a little under-ripe)
1/4 cup granulated sugar
dill or herb of choice (to taste)
dried hot pepper (to taste ~ we used 1/2 of one large for each pint)
garlic cloves (to taste)
approx. 12 peppercorns

2 cups white vinegar

Sterilize 2 pint jars or 1 quart jar. In a pot, bring water, salt, vinegar, and sugar to a boil. Meanwhile, prick each cherry tomato with a pin so that it can absorb the pickling mixture. Put dill, dried hot pepper, peppercorns, and garlic into jars. Fill jars with cherry tomatoes. Once the pickling mixture is boiling rapidly, pour over the cherry tomatoes, leaving 1/2-inch head space. Process in boiling water canner.


Ready for the brine.


Am I in Spain? ... Yummy Gazpacho!


On a hot August day, in the midst of summer heat and Wisconsin humidity (yes, it does get hot here!), there is nothing like a cold, fresh bowl of gazpacho, a piece of crusty cheese bread, and a nice glass of wine!

The following recipe is the combination of a collection of gazpacho recipes we've collected over time. Whenever we attempt to follow a gazpacho recipe, we fail because we're usually missing something. We try to use as many ingredients from our CSA box or garden as possible. It seems counterproductive to run out to the store to get a missing veggie when we have so many to choose from in the fridge or garden. Gazpacho is one of those dishes where freedom is everything!

Here is how we made ours last night!

August Gazpacho
Makes approx. 6 cups
2 cups of chopped tomatoes
1 cup of chopped pepper
1 cup green beans, chopped
1 jalapeno
1 med. onion, chopped
3 garlic cloves
1 cucumber, chopped
2 pieces of crusty bread (we used sourdough)
24 ounces of fresh tomato juice
1/4 cup minced parsley
1/4 cup olive oil (or more to taste)
juice of 1/2 lemon
1/4 cup red wine vinegar
1 tsp. dried oregano
2 Tbs. Worcestershire
salt and pepper to taste
hot sauce to taste

Combine everything except bread, jalapeno, garlic, and tomato juice. In a food processor, combine bread, jalapeno, garlic and tomato juice. Puree until everything is combined. Pour over veggie mixture. Mix to combine. Eat fresh, or refrigerate for one hour before serving (depending on your will power and appetite!).

We like ours with a nice, crisp white wine and some crusty bread!

Based on one-cup servings:
Nutrition Facts
Gazpacho 8/16
Serving Size: 1 serving
Amount Per Serving
Calories155
Total Fat9g
Saturated Fat1.2g
Trans Fat0g
Cholesterol0mg
Sodium341mg
Carbohydrate19.6g
Dietary Fiber3g
Sugars7.9g
Protein3g
Vitamin A 39%Vitamin C 174%
Calcium 4%Iron 8%
(courtesy of www.myfooddiary.com)


30 Tomato Plants ~ Oh My!


Last year, we grew our tomatoes in traditional tomato cages. They did well, but not as well as the ones at our CSA farm did! When we toured Harmony Valley Farm last year, Andy took note of how our farmer, Richard, strung up his tomatoes with twine. Three or four tomato plants were between two large metal posts. Tomatoes were supported by several layers of twine tied to each post. The tomatoes looked easier to pick, and it was clear that less space per tomato plant was needed using this method. What we saw is known to vegetable farmers as the basket weaving method. We decided to give it a try this year!

Another new adventure we tried this year was starting our plants from seed. We purchased a series of grow lights and equipment to construct our makeshift indoor green house. Of course, we had no room other than in our bedroom! So, for quite some time, we went to bed with two cats, thirty tomato plants, and a large spread of other plants. How romantic!

We hadn't intended for there to be so many plants, but watching a plant sprout from a seed and then try to thrive, I sort of developed what I've come to call plant empathy. I couldn't bear to dispose of any of the plants nor could I find anyone to take them off of our hands, so we ended up planting them all, much to Andy's distress. When it came time to transplant them all, we actually had to till two small patches of land to accommodate all the extra foliage. Effectively, we now have three gardens!

Throughout the summer, much maintenance was needed to properly keep up with our new method of tomato planting. To begin basket weaving, put stakes 4 to 6 feet apart. Then, plant 3 to 4 plants between them, 12-15 inches apart. As the plants grow, weave twine between them, tying the twine to each post. This method offers support to the plants as they grow and helps to keep tomatoes off of the ground. The trick is to do it frequently, otherwise one might end up in his/her garden for hours and hours, lost in a chaos of leaves, trying to determine which plant is which as over time they'll grow together if not properly maintained. We ended up needing to weave twine at least once a week during the middle of the season. Now, as the tomatoes have reached their peak, it's all about picking and finding a way to preserve and use all of those tomatoes!


Wednesday, August 12, 2009

Potato Update: A Garden of Spuds!


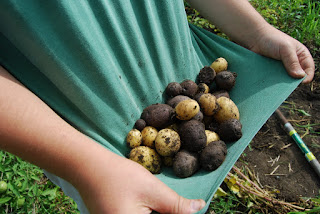
Our garden continues to provide us with a daily harvest of potatoes. I'm enjoying watching Andy become Mr. Mad Kitchen Scientist, enthusiastically concocting new recipes, with our daily bounty of taters.

Andy is a potato lover. In fact, he ordered 7 pounds of seed potatoes earlier this year from Decorah, Iowa's Seed Savers. According to Gardening When It Counts by Steve Solomon, 7 pounds will produce approximately 175 pounds of potatoes! Who said carbs were bad? Seems extreme . . . we will see!

We planted All Blue Potatoes, All Red Potatoes, and Carola Potatoes. Ha! Red, white, and blue for 'Merica! We're so patriotic; oh yes, we are! The Carola Potato is best known for its storage longevity. We're hoping to make cold and hot potato dishes late into the winter! The red and blue potatoes were chosen because we like the colors. . . 'You're not cool unless your food has color!'

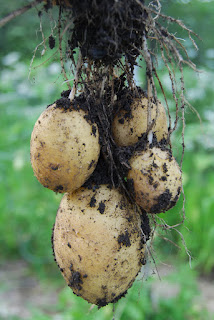
Up until recently, I had no idea how to harvest or dig up potatoes. Andy has taken this potato planting very seriously, and so, in turn, I've learned quite a bit about potato harvesting. To start with, when the potatoes are ready to be harvested, the stems of the potato plants look nearly dead. Currently, our potato plants are a mix of green and brown stems and leaves. To get the potatoes out of the ground, one must use a pitchfork or a shovel to get underneath all of the potatoes. The tines are very long, so it can be very easy to accidentally spear the tubers. It's important to make sure the pitchfork or shovel is completely under the potatoes to protect their delicate skins.

Carola Potatoes

All Blue Potatoes

Last night, we modified the earlier Herbed Potato Salad that we posted in late July. Our CSA, Harmony Valley Farms, included a Brebis cheese from Wisconsin's Butler's Farm in our cheese share last week. Brebis cheese is a sheep's milk cheese with a mild flavor. It's spreadable, much like goat cheese. We thought this would make an excellent addition to our warm potato salad! Check it out!

Herbed New Potatoes with Brebis Cheese
1 - 2 lbs. of new potatoes
2 Tbs. butter
a minimum of 1 clove of garlic, chopped
1/4 c. fresh parsley (mixed with other herbs if you have them ~ thyme, oregano, etc.)
2 ounces Brebis Cheese

Using a heavy pan/pot or Dutch oven with accompanying cover(s), melt butter over low heat. Put in whole or quartered potatoes (depending on size). Dump garlic and herbs over the potatoes. Cover and cook for 25 minutes on low, shaking the pan periodically to avoid sticking. After 25 minutes, remove from heat and put clumps of cheese over potatoes. Cover and let stand for two minutes. Serve hot! Makes four servings.

Tonight, we made a vegan potato salad in preparation for a backyard wiener-roast with my parents tomorrow. Super delicious!

Vegan Potato Salad
8 cups of potatoes, cubed
fresh dill or other herb of choice
1 cup of light Vegan Canola mayo
2 Tbs. Apple Cider Vinegar
2 Tbs. mustard of choice

Boil potatoes until tender. Drain and run under cold water to stop the cooking process. Transfer to a bowl. Drizzle Apple Cider Vinegar over potatoes. Mix in the herbs, mustard, and mayo! Refrigerate for at least one hour before serving.

One cup serving:
Nutrition Facts
potato salad 8/12
Serving Size: 1 serving
Amount Per Serving
Calories206
Total Fat7.2g
Saturated Fat0g
Trans Fat0g
Cholesterol0mg
Sodium504mg
Carbohydrate31.9g
Dietary Fiber3.1g
Sugars1.4g
Protein2.9g
Vitamin A 0%Vitamin C 34%
Calcium 1%Iron 3%
(courtesy of www.myfooddiary.com)

Thursday, August 6, 2009

Gardening Updates

Last week was an exciting week as our first blueberries and our first tomatoes were ready to be picked. We also found a mystery melon plant in the midst of our beets!

  • In the spring of 2008, we transplanted two blueberry bushes. At the time, they looked like sticks with roots. We were hesitant to plant more than two because we had heard that blueberries are difficult to take care of due to the soil pH of 4.5 needed. They are also fussy in that they need lots of water, yet a very well-drained soil. Blueberries take two years to produce fruit, so ours should be in full-producing mode (if everything goes well) by next summer. However, we were surprised to find a couple last week. Six blueberries in all this year!
  • The tomatoes are decorating the garden with splashes of orange and red now. Check out the photo from our first "harvest" of the season.

  • Our mystery melon plant remains...well, a mystery! We're not growing any melons of this sort, so the only conclusion that we can make about how it got there is that last fall, before purchasing our compost bin, we threw food scraps into the spent parts of the garden. Maybe there was a melon seed in our scraps? We did get a lot of melon from our CSA last year . . .

Anyone have any idea what type of melon this is?

Chorizo, Potatoes, Tomatoes, Avocados...Oh My!

Well, it is officially tomato and new potato season! Every day, we're bringing a bag, half-full with tomatoes and new potatoes up from The Backyard Market to our kitchen to be used for immediate eating. Soon, both will be overwhelming and we'll be living in the kitchen, canning and drying. Can't wait!

Two evenings ago, we had a lovely evening of Chardonnay, grilled potatoes for me and grilled potatoes with chorizo sausage for Andy, and an avocado-tomato salad! Delicious! Enjoy our recipes!

Chorizo Sausage and Potato Grilled Salad
5 medium new potatoes (approx.)
1/2 lb. of local chorizo sausage
3 large cloves of garlic, chopped coarsely
1 medium onion, chopped
1 fresh jalapeno or similar pepper, if in season
1 Tbs. of spice blend, containing ground cumin, chili powder, salt, and pepper
1 Tbs. of olive oil or more to taste

Prepare grill to medium to medium-high heat.
Cube potatoes, making sure they are large enough that they will not fall through the holes of a grill pan. Put into the grill pan. Chop garlic, jalapeno, and onion; layer on top of the potatoes. Cut chorizo into 1-inch segments and layer on top of garlic and pepper. Once grill is ready, put on grill. Let heat for three to five minutes. Slowly drizzle olive oil and shake grill pan over fire to distribute oil. Periodically, shake the grill pan, adding spice and/or oil to desired taste. Continue process until potatoes are tender.

A real treat to the chorizo dinner is a splash of Mexican crema and/or a sprinkling of queso fresco on top! Scrumptious!

Avocado and Tomato Salad
We discovered this simple yet elegant salad while studying in the Dominican Republic. The plate comes layered with raw avocados, tomatoes, and onions. Customers add vinegar, oil, salt, and pepper. We loved the simplicity of the salad and how crisp and fresh it tasted. Since we've been home, we've encountered several versions of the salad, but this easy, fresh version remains our favorite.

2 ripe avocados
3 medium tomatoes (We used fresh Nyagous tomatoes from our garden!)
1 small onion
olive oil to taste
cider vinegar to taste
salt and pepper to taste

Pit avocados and slice them into 1/4-inch strips. Slice tomatoes similar to avocados. Extra-thinly slice the onion. Layer the three on a plate. Drizzle olive oil and cider vinegar to taste. (Careful: Too much cider vinegar can overpower the dish. Be sure to taste test before serving!) Add salt and pepper to taste! Goes really well with Chardonnay!

Saturday, August 1, 2009

Art in the Form of Food!


Six years ago, we signed up for a vegetable Community Supported Agriculture (CSA) share with Harmony Valley Farm in Viroqua, WI. We get a box of fresh, in-season, local produce each week, May through February. Veteran CSA-ers often say it takes about three years to really get into the rhythm of the vegetable box. Through experience, we tend to agree. Our first year was a bit of a blissful struggle ~ we often would rack up a big grocery bill buying the extra ingredients for a recipe calling for bits and pieces of our CSA box ~ like 1/4 cup of asparagus or 1 beet or 1 cup spinach! Years two and three, we began to see that substituting one vegetable for another was beneficial and necessary. By year four, we were completely in the groove -- improvising, creating, and really just throwing veggies together to see how they worked with one another. Art in the form of food! Trial and error has been 100% helpful. Now, after six years, we feel confident that we utilize the box well, but we still continue to improve with each passing year.

One of our favorite ways to utilize a lot of veggies is by making pizza! Pizza is tasty at any time of the year, and any veggie pairs well with cheese, crust, and tomato or pesto sauce! Here are three we've made over the last few months.

Homemade Crust (adapted from Bob's Red Mill)
1 Tbs. Active Dry Yeast
3/4 c. warm water (105-115 degrees)
1/4 c. warm milk
2.5 c. flour
2 Tbs. olive oil
1 tsp. sugar
1 tsp. salt

Combine flour, salt, and sugar in a small bowl. In a separate bowl, dissolve yeast in water and milk. Add oil and dry ingredients. Stir until dough becomes tough, then knead on lightly-floured board until smooth and elastic. Form dough into a ball and place in a greased bowl. Cover bowl and let dough rise until doubled. Divide dough in half and form two 12 inch circles, using fingers or a rolling pin. Top with desired toppings and bake in a preheated 450 degree oven for 15-20 minutes.

We often pre-bake the crust in 450 degrees for ten minutes to make it crispier. All a matter of preference!

Pizza #1: Gold Beets and Goat Cheese

We used tomato sauce from last year's tomato harvest for this pizza. Then, rummaging through our fridge, we found 3 gold beets, a small package of goat cheese, numerous scallions and garlic scapes, and local Parmesan cheese (via our CSA cheese share!). We roasted the gold beets in the oven, and then threw on the veggies. After dolloping the pizza with goat cheese, we dusted the whole pizza with grated Parmesan cheese. Way yummier than we expected!

Check out those delicious gold beets!


Pizza #2: Goat Cheese, Greens, and Caramelized Onions

Harmony Valley frequently provides us with recipe ideas for what's in the box during any given week. A few weeks ago, they suggested making a pizza crust, spreading a package of goat cheese on it, and then topping it with a prepared saute mix (which is basically baby greens). We took this idea a step further by caramelizing some onions we had gotten in our box that week and adding walnuts. Delicious!


Pizza #3: Pesto and Seasonal Veggies
This pizza was more traditional than the other two. Our basil plants are flourishing, so pesto pizza seemed an obvious choice. Using the basil and garlic from our garden combined with the basil from our CSA box, we made five cups of pesto. We froze most, but spread a bit on a homemade pizza crust (see recipe above). On top, we put veggies that we had growing in the garden or given to us in the box: cherry tomatoes, zucchini, onions, and garlic. We topped it with summer cheddar cheese from Otter Creek Farms in Black Earth, WI.

This cheese is special in that the farm prides itself on its pastured cows. The cows, in effect, eat seasonally. Therefore, the farm offers a spring cheddar, a summer cheddar, and a fall cheddar. The farmers encourage consumers to take note of the subtle changes in flavor throughout the year as the herd's diet changes. Even more special (in the eyes of any animal-loving vegetarian) is that the farmer himself used to be a vegetarian. This tells me that consumers can trust that the cows are treated with respect. After all, happy cows come from Wisconsin!