Pin It

Saturday, January 27, 2024

Chicken-Keeping Advice

Cardi B, a hilarious flock member

 I'm working on a grad school assignment around multimodal literacies, and when I paused to think about something that I've become quite literate in during my adulthood, chicken-keeping came to mind quite instantly. I'm grateful for this assignment because it has brought me back to this blog, which for years, I've been telling myself to come back to -- mostly because when I blog about sustainable living, I am more attune to it and because blogging gives me a reason to write, which without reason, I often put off even though it brings me peace and joy. 

Today, I'm going to focus on advice that I would personally give to new chicken-keepers after 13 years of chicken-keeping with my husband on our little homestead right outside of Madison, Wisconsin. 

Getting Started:

1. Obviously, check the ordinances for where you live. The last thing that want to do is purchase and fall in love with some chicks only to have to rehome them. Many cities are expanding their chicken allowances: Madison, Wisconsin now allows 8 hens. 

2. Get the Marek's vaccine. I've posted about this before, but it is something you can easily add on. We lost an entire flock. Also, don't get chicks from an unknown source. This is often how chicken diseases are spread. 

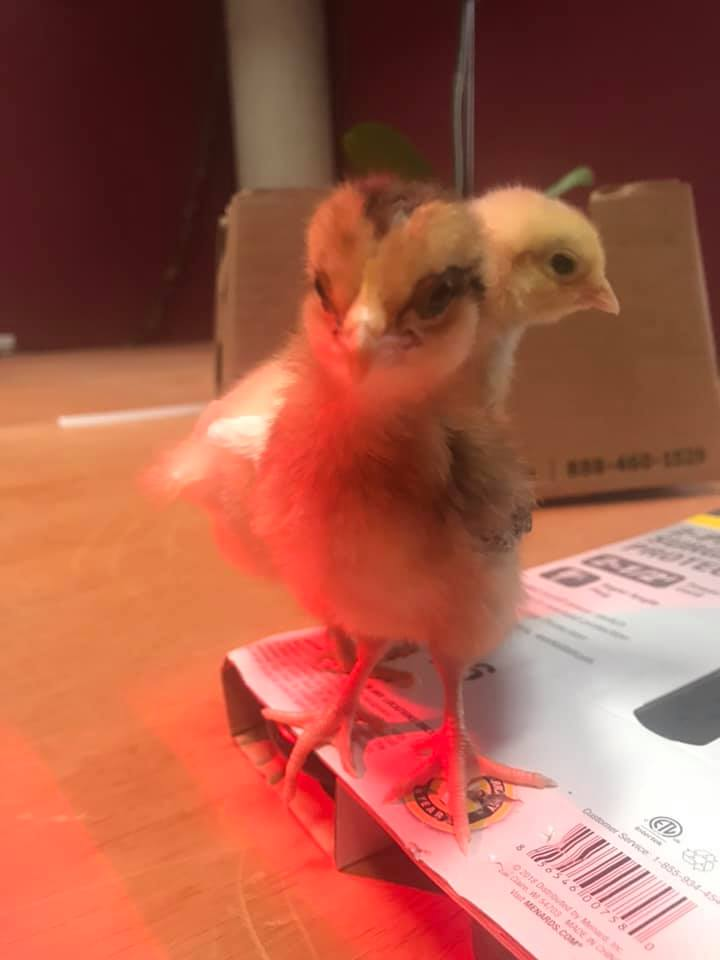
3. You'll need a brooder. Make it more spacious than you think because the chicks grown quickly! If you're adding to a flock, pullets need to be nearly the same size as your existing chickens in order for a safe transition. 

4. Bond. Spend lots of time handling the chicks. The more time, the better for your long-term relationship and ease of handling for illness, vet appointments, and so on. 

5. Make sure your coop is predator-proof. Get a hawk-proof netting. Use hardware cloth rather than chicken wire around your run. Put pavers or garden-beds around your run to prevent digging predators a way in. 

Day-to-day maintenance:

Beautiful Adele, with space to play.

1. Continue that bonding as often as time allows. 

2. Did you know that you can freeze eggs if you get too many? You can! Simply crack them open into a Ball jar and write the number of eggs inside. Pop into the freezer. When your hens are molting or not producing eggs, these will come in handy! 

3. Feed them healthy table scraps. Most veggies and fruit are okay, and the they not only make your chickens healthier, they also make the eggs more nutritious. 

4. Make sure they have space to run and play. Whether that means that you give them time to run around your yard each day or you have an amazing run, healthy and happy hens need space. 

5. Close your coops every night. No matter how secure that you think they are. 

6. If it's too hot outside, make sure you're problem solving. You can spray down the outside of your coop with cold water. You can give your hens frozen veggies or fruit. Make sure there is shade and that you're giving your chickens enough water throughout the day. 


Other things I've learned:

Day-old chicks

  • If you're anything like me, you don't want to contribute to the violent death of any animal. When
    we order only female chickens, we must think about what's happening to the roosters. It's not great. If you have space, you can have a bachelor pad of roosters as long as there are no hens in sight. Something to consider! I, like most people, assumed that roosters could never coexist. 
  • Chickens purr when cozied up on your lap, near sleep. How cool is that! 
  • Chickens tend to molt in the fall --> you'll notice that many of their feathers are gone. It is quite painful for them, so avoid picking them up during this time if possible. 
  • They dust-bathe. It's adorable. 
Have fun with your chickens! They are a pleasure to have! I love talking chickens, so feel free to post questions! 


Sunday, August 30, 2015

Bourbon and Blueberry Bundt Cake with Blueberry-Basil-Bourbon Glaze

What could be better than a dense, delicious, fruity bundt cake? One drenched in bourbon, of course!

This recipe was inspired by a list of ingredients from our friend and house-sitter. When asked how we could repay him for taking care of our chickens, cats, gardens, and dog while we gallivanted around the northern part of the country, he replied with his usual, kind, "Make me dinner."  He suggested a list of ingredients and among them  were blueberries, bourbon, and basil. Upon our first attempt with googling the ingredients, we discovered this combination makes quite the popular doughnut choice.  Who knew?

We went to the trusty Paprika app on our iPad and found several recipes for blueberry-bourbon cakes and glazes, but settled on  modifying this one, and then we added our own extra alcohol-y twist with a Bourbon Sauce.  Despite an appetizer of fried plantains, a peanut stew for dinner, and drinks to fill in the rest, we all had room to indulge in this keeper!

The amount of bourbon that we added to this cake would make a sailor whistle. The first saucepan of bourbon sauce soaked right in, so we cooked up another. We added that, which proceeded to soak right in as well. And then we added the glaze on top, full of bourbon. Despite using almost a bottle, the bourbon melded delightfully well with the blueberry and basil flavors. The cake was rich and moist, and it made my summer night feel all the more summery. I predict that it will make snowed-in, wintry nights all the more wintry, too.

Without a doubt, this cake will show up on our table again soon.

Ingredients for the cake:
3 cups flour
1 tsp. baking powder
1/2 tsp. baking soda
1 tsp sea salt
1 cup unsalted butter
1 1/2 cups sugar
1/2 cup firmly packed brown sugar
4 eggs, at room temperature
1/2 tsp. vanilla
1/4 cup bourbon
1 cup buttermilk, at room temperature
1-2 cups blueberries (depending on your preference)

Ingredients for Bourbon Sauce (we ended up making three batches of this...we like ours real dense!):
1/2 cup bourbon
1/2 cup unsalted butter
1 tsp vanilla extract
3/4 cup sugar

Ingredients for Glaze 
1 cup fresh blueberries
1 Tablespoon fresh basil, chopped
2-3 tablespoons bourbon
3 cups sifted powdered sugar

Directions:
1. Grease a 10-cup metal tube or bundt pan. Preheat the oven to 350 degrees F.
2. To make the cake, sift together the flour, baking soda, baking powder, and salt in a bowl.
3. Cream the butter and sugars together on medium-high speed until fluffy, about five minutes.
4. Blend in the eggs, one at a time and add the vanilla. Combine the bourboun and buttermilk in a bowl. With the mixer on low, add the flour mixture in three parts, alternating with the bourbon mixture in two parts.
5. Pour the batter evenly in the bundt cake pan. Bake until the cake is golden and springs back when touched, about 40 to 45 minutes.
6. Before the cake is finished, you'll make the bourbon sauce. Heat a small saucepan and melt the butter. Mix in the sugar and vanilla.
7. Remove the pan from the heat, pour in the bourbon, and combine butter mixture with bourbon.
8. Put the pan back on the stove and heat until slightly bubbly. Sugar should be dissolved.
9. Poke holes in your finished cake, and pour the sauce over it. You can reserve some for the top, if you'd like.
10. Let the cake completely cool, and then flip it over onto a serving platter.

11. To make the glaze, start by pulsing the blueberries, basil, and 2 Tbs of bourbon in a food processor or blender until smooth.
12. In a large bowl, measure out the powdered sugar. Gradually stir the blueberry mixture into the sugar. Taste and add the last Tbs of bourbon if you desire. Drizzle over cooked cake.

13 And then, if you like strong libations in your bakery, you can always add more of the Bourbon Sauce! 

Wednesday, August 19, 2015

Salty and Crispy: Kale Chips

Kale chips have been all the rage for a few years. And why wouldn't they be? Salty. Crispy. Can't Stop At Just One. And (semi) nutritious. What could be better?

They're super easy to make, and it's fun to play with different seasonings and flavorings. I like cracked pepper!


Ingredients:
A bunch of kale
Olive oil
Salt
Seasonings of your choice

Process:
1. Wash kale to remove dirt.
2. Rip chip-sized pieces off the rib of the kale. Discard the ribs. Use salad spinner to dry kale pieces.

3. Toss kale pieces with enough olive oil to lightly coat throughout.
4. Spread on cookie sheets.

5. Sprinkle with salt and other seasonings (I love pepper, for example!).
6. Bake at 350 for 10-12 minutes, or  until kale chips are crisp.

We store ours in open ziploc bags with a piece of paper towel to soak up excess liquid over time.
They should last for up to a week.

Enjoy!  

Monday, August 3, 2015

Pickled Beets, 2015


Full disclosure: this recipe is 100% not our own. The reason? Every year, I forget from which source I located the pickled beets recipe because I have never blogged about pickling beets. I go searching online, browsing through other cookbooks....only to just choose something random and different each and every year. So, I'm shamelessly blogging about a recipe I found in a cookbook.

And ... the beets in this cookbook are wonderful! Slightly sweet, tangy, and perfectly pickled, this is my favorite recipe for pickled beets thus far. At this pint, I fully endorse The Complete Book of Small-Batch Preserving. Granted, this is the only recipe from the book that I've seen to fruition, but I bought this gem only a month ago. I love that the cookbook focuses on small batches because, let's be realistic, I live with only one other human: we can only consume so much food. 

Anyway, try this pickled beets recipe! We used chioggia beets and golden beets, hence the interesting colors in the jars. We also a little more than doubled this, so we ended up with 4.5 quarts

Easy Spiced Pickled Beets (makes 4 pints)

8-15 pounds of fresh beets
2 cups sugar
2 cups white vinegar
1/3 cup water
16 whole cloves
8 whole allspice berries
2 cinnamon sticks, about 4 inches long
2 tsp pickling salt

1. Trim beets, leaving 1 inch of stem and taproot attached. Put in pot and cover with water. Bring to a boil, and then turn down heat, cover, and simmer for 25 to 45 minutes. Be careful not to overcook them! Cook just until tender..... 

Once tender, drain and rinse with cold water. Remove skins and cut beets into desired size pieces. If you have chickens, be sure to save the scraps! They loved them....
Chicken treats or compost ingredients?
2. Combine sugar, vinegar, and water in a large saucepan. Bring to a boil over high heat. Stir occasionally. 

3. In sanitized, hot jars, place 4 cloves, 2 allspice berries, and 1/2 cinnamon stick in each jar. Pack beats into jar. Pour hot liquid over beets to within 1/2 inch of rim. 

4. Process 30 minutes for 2-cup jars and 35 minutes for 4-cup jars. 


Thursday, January 1, 2015

Pinterest and Sweet Potato Pie Dip

2014 was my year of Pinterest!  This pin was the basis for building a floor-to-ceiling bookshelf in our house. We now have a shelf behind our sofa in our small living room because I saw this pin.  I brought a cheesy, gooey Jalapeno Popper dip for a Christmas Eve appetizer thanks to this pin. I used the recipe for a tart, sweet, and spicy Jalapeno Cranberry dip on this pin for Thanksgiving, Christmas Eve, and again for New Year's. Last night, I made a creamy Sweet Potato Pie dip because I thankfully pinned this a while back.

I'm blogging about the Sweet Potato Pie dip because it is definitely a keeper, I want to make a minor adjustment to the original recipe, and family members who sampled it last night asked for the recipe AND suggested alternate uses for leftovers, which I want to share here.

Dip:
1 (8-oz) block of cream cheese, softened
1 cup brown sugar
2 cups cooked, mashed sweet potatoes
2 Tbs butter
1 tsp vanilla
1 tsp cinnamon
1/4 tsp nutmeg
Graham crackers or ginger snaps

Pecan Topping:
1/4 cup brown sugar
1/4 cup white sugar
1/4 cup butter, melted
1/2 cup dry oatmeal
1/2 cup chopped pecans


 Directions:
1. Preheat oven to 350.
2. When oven is ready, bake the sweet potatoes until they are fork-tender.
3. Mix together the cream cheese and brown sugar. Add the mashed sweet potatoes, butter, vanilla, cinnamon and nutmeg. I used a food processor to get the consistency nice and smooth.
4. Mix together all the ingredients of the pecan topping. I added oatmeal to the recipe because when I made it according to the original recipe (without oatmeal), the butter pooled on the top. Adding the oatmeal will give the dip a crisp-like feel and will eliminate butter pooling.
5. Sprinkle the topping on top. Bake for 15-20 minutes and serve with graham crackers and/or ginger snaps.

This dip was so good that by the time I remembered to take a photo for the blog, we had it 1/4 eaten!

For leftovers (if you  have any) or if you just want a twist, this would make a classy dessert served in nice glasses decorated with a cookie dipped onto the top. You could also add a dollop of real whipping cream or ice cream on top.

Pinterest treated me well in 2014. Hoping 2015 brings the same type of success!


A Feast for Our Chickens, 2015

This New Year's Day, we decided to celebrate the lives of our backyard flock chickens. Inspired by Heartland Farm Sanctuary's Feast for the Turkeys event, we made up a meal in which the chickens were the honored guests rather than the main dish.

We halved a few Delicata squashes and filled them with a mix of cranberries, beets, carrots, kale, yogurt, and Bob's Red Mill 10 Grain Cereal.

One half squash for each chicken
We spread them throughout the run.
 As you can see in the pictures below, our chickens were delighted. Rocky, the rooster, expressed  his excitement by getting a case of the hiccups.

Our youngest chickens, hatched on August 18th, are a bit more skittish around us than any of our other chickens have been. Surrounded by squash goodness, they hung out around us this morning as they enjoyed their feast. What a treat for all of us!


Happy New Year!

Monday, November 3, 2014

Salads in Jars

Yumminess before the jars.
A couple of years ago, I made my first set of salads in glass jars for lunches; they were convenient and delicious, but I fell into my old habits and reverted back to leftovers and soups. This past week, our CSA box contained a bag of spinach and another bag of salad greens and carrots and celery and radishes and broccoli and I thought -- hey! I should really get back to those salads.

By the way, making salads in mason jars for weekly lunches is so much faster than making a pot of soup. Duh, right?

The brilliant news is that jar salads stay fresh for a solid 5-7 days. I'll post a picture of Friday's salad later this week just to confirm.


What are the rules?
  • Put the dressing at the bottom. I used 2 Tablespoons, which was plenty for me.
  • Then, put something that can serve as a barrier between the lettuce and dressing. Obviously, this layer is going to get the most exposure to the dressing, so choose a more sturdy vegetable. I used carrots, celery, radishes, and broccoli for this week's salad. Use whatever you have. 
  • Next, add a grain or noodles, if you'd like. I used a quinoa this week.
  • If you're up to it, a protein such as cheese or hard-boiled egg goes next.
  • Finally, the greens themselves.
How do you eat it?
  • I take a bowl to dump mine into, but you could also try your luck just diving right into the glass jar.
  • Just dump it right in!
I use Myfitnesspal.com to track my calories and nutrition information, and I got an immediate green (which is good!) on the fiber section. The other side benefit of making salads in jars is for the sheer aesthetic pleasure of it! They are beautiful.