Pin It

Showing posts with label tomatoes. Show all posts

Sunday, September 8, 2013

A Ratatouille of Sorts

My last post was based off of another person's recipe. This post is based off of another person's recipe. Apparently, I've been more into reading recipes than  I have been into whipping up original creations lately. That said, this ratatouille feels like the answer for every overzealous gardener who finds him/herself with an abundance of veggies. Like the Swiss Roll recipe I posted last month, the ingredients in this recipe are flexible; I've made two different versions during this week alone.

The inspiration for this comes from The Week magazine's "Recipe of the Week" page. Officially called "Ratatouille tian," this is often served over rice or as fillings for a sandwich. Here at our house, we simply make it and serve it up. We also don't have the proper baking ware -- the tian is actually the earthen baking ware used traditionally. We simply used a glass pie pan, which seems to work just fine.

I also would recommend adding in sliced sweet peppers or other vegetables that would caramelize well. 

This recipe is easy to put together, but does require about 1.5 hours of baking!

Ingredients:
3-4 small eggplant
salt
3 tsp herbs de Provence
3-4 zucchini
6-8 Roma tomatoes
olive oil
2 yellow onions
8 fresh sage leaves, minced
2+ garlic cloves, minced

Directions:
1. Cut eggplants into 1/8-inch sections.  In a colander, toss with a teaspoon of salt. Let sit for one (or more) hour(s). Transfer to a bowl, and add a teaspoon of herbs de Provence.
2. Cut zucchini and tomatoes into 1/8-rounds. Put into two separate bowls. Sprinkle each vegetable with 1/2 teaspoon salt and 1 tsp herbs de Provence.
3. Preheat oven to 350. Lightly oil baking dish. Thinly slice onions. Spread them evenly on the bottom of the pan. Drizzle with olive oil and sprinkle with salt.
4. Arrange a row of one of the vegetables along the side of the...pack them tight enough that they almost stand upright. Follow with another row of vegetables. And then the other. Alternate to fill up the pan. If you have extras at the end, simply stuff them into the rows.
5. Drizzle with 3 Tbsp olive oil, spread the minced garlic and cut-up sage leaves among the veggies, and cover loosely with foil. Bake for 30 minutes.
6. Turn up the heat to 425, and bake 30 more minutes.
7. Remove foil, and bake for 30 more minutes or until the veggies are tender, and the tips are lightly browned.
8. Serve  hot, warm, or cold.

Monday, September 5, 2011

Tomato Flops: Perfect for Pizza

We are in love with our dehydrator. Slice produce up, season it (or not), and place it all on trays. Turn the dehydrator on, slide the trays in, and forget about it. Half a day later, poof! Dehydrated, preserved garden goodies.

One example is what we call Tomato Flops. We got this idea from The Genius: Mrs. Barbara Kingsolver's book Animal, Vegetable, Miracle, but have adapted it over the past few years to our own liking. These flops are stupendous on pizza in the winter. They pop like little bursts of summer in your mouth!

Here's how we made ours:

Ingredients:
Roma Tomatoes
Dried Italian herbs (Oregano, Basil, Parsley, Savory, Thyme, etc...)
Garlic (if desired)

Process:
1. Slice Roma tomatoes in half. 
2. Sprinkle with desired amount of herbs. Top with a very thin slice of garlic, if you enjoy that sort of thing. We did one tray with garlic and herbs, but the rest were just covered with herbs.
3. Dehydrate until desired consistency. We recommend not completely dehydrating them. We let ours go about 12 hours.
4. Since we don't dry them completely, we freeze them in bags for winter use.

Last weekend, we froze 10 bags, with a dozen flops each. They're piled in the freezer, waiting to bring us a bit of sunshine in the middle of our Wisconsin Winter.

Before

After

Sunday, August 28, 2011

Livin' in the Kitch'n

The end of August=bustle, bustle, bustle. Of course, the garden is at its peak right when work is at its most stressful time, right?  Luckily for me, I feel comfortable and happy, alongside my cooking partner/husband in a hot, steamy kitchen with loads of bubbling pots, a whistling water canner, the smell of vinegar and vegetables, and pets running rampant.

Last Saturday, we made pizza sauce. We loved the recipe we used from Barbara Kingsolver's Animal, Vegetable, Miracle so much last year that we used it again this year. We cooked down 25 lbs. of Roma tomatoes and ended up with 10 pints of pizza sauce. Our only change to last year's process is that we used a bit less cinnamon, and we cooked it down a bit more, so we ended up with less pints, but thicker sauce.

Also, we processed  25 lbs. of Romas into 8 quarts of canned diced tomatoes. These are spectacular to have in the pantry for everything from spaghetti to soups to pizzas in the fall and winter. Last year's lasted us through this May. We'll have to can more to make that happen again this year. 

And, we have more cabbage fermenting right now. This time, the crock is full! I think we'll be kraut-ready this fall and winter. Bring on the Ruebens and Ritz crackers!

Plus, the freezer is receiving the fruits of our labor. This week, I froze carrots, celery, and green peppers.

Tomorrow is beet day!  Stay tuned...

Striped Cavern Tomatoes: The Perfect Stuffers

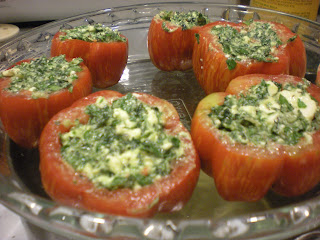
 Ever heard of a striped cavern tomato? If you haven't had one, I advise you to add a pack of seeds to your idealized 2012 garden now! These , in fact,are  the perfect stuffing tomato. Plus, they will keep in  your fridge for up to 4 weeks after picking.

The texture and shape of a striped cavern are reminiscent of a bell pepper. The inside is nearly hollow with very few seeds, and the outside walls are sturdy. We grow 1-2 plants a year - the plants are consistent producers, so 1-2 provide/s us with plenty of grilling/stuffing opportunities. Any extra we add to our canning pile as they work well for diced tomatoes too.

Last week, we received Butler Farms Feta Cheese in Sunflower Oil in our CSA Cheese Share. Honestly, this cheese is beyond delicious. The sunflower oil adds an indescribable flavor. Usually, I simply put the tub of cheese with its oils and herbs over a salad, but this time, I combined it with freshly cut Swiss chard and stuffed spoonfuls into our striped caverns. We got the charcoal grill ready and had a glass (or two!) of chardonnay while we waited.

The result was amazing. The tomatoes' walls held the cheese so well that we used steak knives to cut into them. I can hardly wait until this harmony of flavors is available again!

Sunday, September 12, 2010

Final Canning Weekend of the Season?

This weekend, Andy was sick...and we had 25 pounds of Romas and 10 pounds of tomatillos to can. He mustered through parts of the process, but my role was much bigger than normally expected on a CANNING WEEKEND.

We canned 7.5 quarts of diced tomatoes, using the same process we've used for years.

And, we made 10 pints of canned salsa verde. This year we've frozen quite a haul of various salsas, but this is the first time in our lives that we've canned salsa. We're wondering what the difference between the frozen salsa and the canned salsa will be. All of the our canned and frozen salsas are blended for the sake of consistency. I don't like slimy cilantro, for example. What do all of you think? Have you had better results with canning or with freezing salsa? Obviously canning is more work and often takes more of the nutrients out of the food than freezing does, so we're wondering: what's the benefit? Please comment!

We used a recipe from the National Center for Home Food Preservation. Here it is (copied and pasted):

Tomatillo Green Salsa

  • 5 cups chopped tomatillos
  • 1-½ cups seeded, chopped long green chiles
  • ½ cup seeded, finely chopped jalapeño peppers
  • 4 cups chopped onions
  • 1 cup bottled lemon or lime juice
  • 6 cloves garlic, finely chopped
  • 1 tablespoon ground cumin (optional)
  • 3 tablespoons dried oregano leaves (optional)
  • 1 tablespoon salt
  • 1 teaspoon black pepper
Read more about ingredients. Yield: About 5 pints
Please read Using Boiling Water Canners before beginning. If this is your first time canning, it is recommended that you read Principles of Home Canning.
Procedure:
Caution: Wear plastic or rubber gloves and do not touch your face while handling or cutting hot peppers. If you do not wear gloves, wash hands thoroughly with soap and water before touching your face or eyes.
Preparing Tomatillos: Remove the dry outer husks from tomatillos; wash thoroughly. They do not need to be peeled or seeded.
Preparing Peppers: The skin of long green chiles may be tough and can be removed by heating the peppers. Usually when peppers are finely chopped, they do not need to be skinned. If you choose to peel chiles, slit each pepper along the side to allow steam to escape. Peel using one of these two methods:
  • Oven or broiler method to blister skins - Place chiles in a hot oven (400°F) or broiler for 6 to 8 minutes until skins blister.

  • Range-top method to blister skins - Cover hot burner (either gas or electric) with heavy wire mesh. Place peppers on burner for several minutes until skins blister.

  • To peel, after blistering skins, place peppers in a pan and cover with a damp cloth. (This will make peeling the peppers easier.) Cool several minutes; slip off skins. Discard seeds and chop.
The jalapeño peppers do not need to be peeled, but seeds are often removed.
Hot Pack: Combine all ingredients in a large saucepan and stir frequently over high heat until mixture begins to boil, then reduce heat and simmer for 2O minutes, stirring occasionally. Ladle hot into clean, hot pint jars, leaving ½-inch headspace. Remove air bubbles and adjust headspace if needed. Wipe rims of jars with a dampened, clean paper towel; apply two-piece metal canning lids. Process in a boiling water canner according to the recommendations in Table 1.
Table 1. Recommended process time for Tomatillo Green Salsa in a boiling-water canner.
  Process Time at Altitudes of
Style of Pack Jar Size 0 - 1,000 ft 1,001 - 6,000 ft Above 6,000 ft
Hot Pints 15 min 20 25
Note: You may use green tomatoes in this recipe instead of tomatillos.
IMPORTANT:
The only other change you can safely make in this salsa recipe is to change the amount of spices and herbs. Do not alter the proportions of vegetables to acid and tomatoes because it might make the salsa unsafe. Do not substitute vinegar for the lemon juice.

Nutrition Information (Estimated values using Nutritionist Pro™ software)
Per 2 Tbsp: Calories 10, Total Fat 0 g, Sodium 89 mg, Fiber 0 g, Protein 0 g. 
Daily Values: Vitamin A 1%, Vitamin C 17%, Calcium 1%, Iron 1%.
Percent Daily Values based on Dietary Reference Intakes.
 -------
We'll see what the future holds, but I'm wondering if this is the last canning weekend of the year!  The pantry is looking good, and the freezer is loaded with goodies. There is always a sense of bitter-sweetness at the end of the season. On one hand, being done frees up some time, but I believe solidly that there is nothing quite like listening to This American Life or some good tunes, drinking a cup of tea (and later wine), and steaming up the kitchen with cooking. Until next year though... enjoy the harvest!

Tuesday, August 31, 2010

Pizza and a Good Book


We had to let this cook down for hours and hours. 
For years, we've been searching to find a thick, flavorful pizza sauce to make and to can. Lo' and behold if my favorite author didn't include the very recipe in her book, Animal, Vegetable, Miracle. Throughout the book, Barbara Kingsolver's family writes personal narratives about food, and so this pizza sauce recipe actually comes from Camille, her oldest daughter. She shared the family's secret recipe in a chapter entitled, Living In a Red State ~ both to imply the political leanings of Kentucky at the time and the fact that they harvested nearly a ton of tomatoes the summer about which they wrote the book.


Anyway, our tomato crop has been hit or miss this year, so we ended up purchasing two 25 lbs boxes from our CSA farm, Harmony Valley. Combined with our own tomato crops, we have put quite a lot of work in . . . and we have quite a lot of work ahead of us.

On Sunday evening, we prepared the sauce, using some of our tomatoes and one of the boxes. The house smelled great, our cats acted as if they were about to die from heat stroke (see photo of Tucker to the right), and we ended up with 5 pints and 9 half-pints of pizza sauce. Between those and our freezer pesto, I think Andy's pizza addiction should be covered throughout the winter and spring.                        


Here's the amazing recipe, Family Secret Tomato Sauce, from the book, Animal, Vegetable, Miracle.

Our assembly line. L to R: boiling for 2-3 seconds, ice bath, and then skinning/de-seeding.


Look at all of those onions!


Thursday, August 19, 2010

What to do with all of those tomatoes? Can 'em!

Tomatoes chilling in an ice bath.
Canning can be a looming task to food preservation/gardening newbies. This blog entry is to reassure those of you nervous ladies and gents out there that it really is quite a simple process that's well worth the effort.

The first food that we ever canned was a batch of diced tomatoes. So versatile, we used them in winter spaghetti dishes, as pizza toppings, and in soups. Since year one, they've been a staple item in our pantry.


Ingredients:
Tomatoes
Lemon Juice
Salt (optional)
Sugar (optional)

Instructions:

1. Sterilize quart jars and lids by placing them in boiling water for 1-2 minutes. Or if your dish washer has a sterilize cycle, use that.

2. Prepare tomatoes for processing. Cut an X onto the bottom of the fruit. This will help make peeling super easy.

3. Prepare an ice bath. We usually fill our sink with cold water and ice, but a large pot or bowl works too. 

4. Boil water on the stove. Put the fruit into the boiling water for a few seconds (and no longer than a minute) to loosen the skin. When you see the skin split and loosen, remove the tomatoes.

5. Immediately after removing from the boiling water, put the fruit into the ice bath.

6. Take the fruit out of the ice bath. The skin should slip right off  (I like to save the skins for the freezer to make broth later and/or to give the warm tomato skins to my chickens.)

7.If desired, remove the guts from the center. Simply cut the tomato lengthwise, and with your fingers or a spoon, remove the seeds and pulp from the center.

8. Dice the fruit to desired size.

9. To ensure non-spoilage, add 2 Tbs. of lemon juice to each quart jar. Sometimes, we add sugar to make sure that the tomatoes don't have a lemony flavor. If desired, add a pinch of salt here.

10.Pack the jars with the fruit, leaving 1/2-inch head space at the top of the jars. Be sure that the jar lids are dry to ensure a tight, secure seal.

11. Process using a water bath or a steam canner.

 If doing pints, process for 40 minutes. If doing quarts, process for 45 minutes. Specific times are below (taken from: source):
Recommended process time for Crushed Tomatoes in a boiling-water canner.
Process Time at Altitudes of
Style of Pack Jar Size 0 - 1,000 ft 1,001 - 3,000 ft 3,001 - 6,000 ft Above 6,000 ft
Hot Pints 35 min 40 45 50
Quarts 45 50 55 60

For you novice canners, a word of caution: canning is touchy. You have to follow a recipe exactly to avoid potential spoilage. Read the directions for your specific canner, and cross-check other sources for processing times to ensure a good, healthy, safe, product. We like: www.pickyourown.org.

With that said, please do can! It's a wonderful way to preserve farm-fresh produce for the fall, winter, and early spring months. Nature has seasons. Here, in Wisconsin, we're not meant to go to the store in December and find red, ripe tomatoes. It's not possible to grow them anywhere around here at that time. Duh, right?

One way to embrace the seasons (and avoid blindly trekking food across the country or world via excess petroleum, while dishing out money to Dole fruits or some other big name) is by eating fresh, yummy tomatoes in the summer, and then embracing in the delight and beauty of your Ball jar filled with prepared tomatoes in the winter. It's amazing how great both can taste when you give yourself time to miss them. Plus, you'd be amazed as to how beautiful a pantry full of a variety of canned food looks.

Monday, August 17, 2009

Am I in Spain? ... Yummy Gazpacho!


On a hot August day, in the midst of summer heat and Wisconsin humidity (yes, it does get hot here!), there is nothing like a cold, fresh bowl of gazpacho, a piece of crusty cheese bread, and a nice glass of wine!

The following recipe is the combination of a collection of gazpacho recipes we've collected over time. Whenever we attempt to follow a gazpacho recipe, we fail because we're usually missing something. We try to use as many ingredients from our CSA box or garden as possible. It seems counterproductive to run out to the store to get a missing veggie when we have so many to choose from in the fridge or garden. Gazpacho is one of those dishes where freedom is everything!

Here is how we made ours last night!

August Gazpacho
Makes approx. 6 cups
2 cups of chopped tomatoes
1 cup of chopped pepper
1 cup green beans, chopped
1 jalapeno
1 med. onion, chopped
3 garlic cloves
1 cucumber, chopped
2 pieces of crusty bread (we used sourdough)
24 ounces of fresh tomato juice
1/4 cup minced parsley
1/4 cup olive oil (or more to taste)
juice of 1/2 lemon
1/4 cup red wine vinegar
1 tsp. dried oregano
2 Tbs. Worcestershire
salt and pepper to taste
hot sauce to taste

Combine everything except bread, jalapeno, garlic, and tomato juice. In a food processor, combine bread, jalapeno, garlic and tomato juice. Puree until everything is combined. Pour over veggie mixture. Mix to combine. Eat fresh, or refrigerate for one hour before serving (depending on your will power and appetite!).

We like ours with a nice, crisp white wine and some crusty bread!

Based on one-cup servings:
Nutrition Facts
Gazpacho 8/16
Serving Size: 1 serving
Amount Per Serving
Calories155
Total Fat9g
Saturated Fat1.2g
Trans Fat0g
Cholesterol0mg
Sodium341mg
Carbohydrate19.6g
Dietary Fiber3g
Sugars7.9g
Protein3g
Vitamin A 39%Vitamin C 174%
Calcium 4%Iron 8%
(courtesy of www.myfooddiary.com)


30 Tomato Plants ~ Oh My!


Last year, we grew our tomatoes in traditional tomato cages. They did well, but not as well as the ones at our CSA farm did! When we toured Harmony Valley Farm last year, Andy took note of how our farmer, Richard, strung up his tomatoes with twine. Three or four tomato plants were between two large metal posts. Tomatoes were supported by several layers of twine tied to each post. The tomatoes looked easier to pick, and it was clear that less space per tomato plant was needed using this method. What we saw is known to vegetable farmers as the basket weaving method. We decided to give it a try this year!

Another new adventure we tried this year was starting our plants from seed. We purchased a series of grow lights and equipment to construct our makeshift indoor green house. Of course, we had no room other than in our bedroom! So, for quite some time, we went to bed with two cats, thirty tomato plants, and a large spread of other plants. How romantic!

We hadn't intended for there to be so many plants, but watching a plant sprout from a seed and then try to thrive, I sort of developed what I've come to call plant empathy. I couldn't bear to dispose of any of the plants nor could I find anyone to take them off of our hands, so we ended up planting them all, much to Andy's distress. When it came time to transplant them all, we actually had to till two small patches of land to accommodate all the extra foliage. Effectively, we now have three gardens!

Throughout the summer, much maintenance was needed to properly keep up with our new method of tomato planting. To begin basket weaving, put stakes 4 to 6 feet apart. Then, plant 3 to 4 plants between them, 12-15 inches apart. As the plants grow, weave twine between them, tying the twine to each post. This method offers support to the plants as they grow and helps to keep tomatoes off of the ground. The trick is to do it frequently, otherwise one might end up in his/her garden for hours and hours, lost in a chaos of leaves, trying to determine which plant is which as over time they'll grow together if not properly maintained. We ended up needing to weave twine at least once a week during the middle of the season. Now, as the tomatoes have reached their peak, it's all about picking and finding a way to preserve and use all of those tomatoes!