Pin It

Showing posts with label food preservation. Show all posts

Monday, August 3, 2015

Pickled Beets, 2015


Full disclosure: this recipe is 100% not our own. The reason? Every year, I forget from which source I located the pickled beets recipe because I have never blogged about pickling beets. I go searching online, browsing through other cookbooks....only to just choose something random and different each and every year. So, I'm shamelessly blogging about a recipe I found in a cookbook.

And ... the beets in this cookbook are wonderful! Slightly sweet, tangy, and perfectly pickled, this is my favorite recipe for pickled beets thus far. At this pint, I fully endorse The Complete Book of Small-Batch Preserving. Granted, this is the only recipe from the book that I've seen to fruition, but I bought this gem only a month ago. I love that the cookbook focuses on small batches because, let's be realistic, I live with only one other human: we can only consume so much food. 

Anyway, try this pickled beets recipe! We used chioggia beets and golden beets, hence the interesting colors in the jars. We also a little more than doubled this, so we ended up with 4.5 quarts

Easy Spiced Pickled Beets (makes 4 pints)

8-15 pounds of fresh beets
2 cups sugar
2 cups white vinegar
1/3 cup water
16 whole cloves
8 whole allspice berries
2 cinnamon sticks, about 4 inches long
2 tsp pickling salt

1. Trim beets, leaving 1 inch of stem and taproot attached. Put in pot and cover with water. Bring to a boil, and then turn down heat, cover, and simmer for 25 to 45 minutes. Be careful not to overcook them! Cook just until tender..... 

Once tender, drain and rinse with cold water. Remove skins and cut beets into desired size pieces. If you have chickens, be sure to save the scraps! They loved them....
Chicken treats or compost ingredients?
2. Combine sugar, vinegar, and water in a large saucepan. Bring to a boil over high heat. Stir occasionally. 

3. In sanitized, hot jars, place 4 cloves, 2 allspice berries, and 1/2 cinnamon stick in each jar. Pack beats into jar. Pour hot liquid over beets to within 1/2 inch of rim. 

4. Process 30 minutes for 2-cup jars and 35 minutes for 4-cup jars. 


Sunday, October 23, 2011

Fall Harvest: Beans and Greens


Beautiful Swiss Chard
We've been busy, busy the past few weeks and weekends, as I'm sure most of you all have been. Luckily, the weather has been such that we personally haven't been too worried about the veggies left in our garden or the amount of work yet to be done before the first snowfall. This weekend, other than Saturday-morning test proctoring and Sunday paper-correcting, we had no plans! While it seems we have overzealous ideas about the amount of work that realistically can be done in a day, we still managed to get a significant start on cleaning up a few garden beds and harvesting/preserving a bit of food.

First, we harvested three of our four pole bean beds. Our Trail of Tears Black Bean bed was full of skinny, gray/brown pods. Each contained about 8 small beans inside. We managed to get a whole quart of those. Our Mother Stallard bean beds produced about a quart also. Dry beans are a must for growing in our semi-vegetarian  household. We've already decided that  next year, we will triple the amount of beans. Not only are homegrown beans 100% ethical, they are also economical. Compare the price of a burger to that of a homemade bean burger made with beans from your backyard. Crazy savings!
Mother Stallard and Trail of Tears Beans

Plus, beans are just so gosh darn beautiful. The process of planting,  harvesting, picking, and then storing them entertains and tickles all of our senses. Luckily, we have beautiful Christmas Lima beans yet to harvest.

Next, we cut Swiss Chard. We'd been waiting to make a big harvest until a frost hit. In cold weather, some vegetables respond by producing more sugar because sugar doesn't freeze;  hence, the veggies are a bit sweeter. It's worth noting though, that a freeze will kill Swiss Chard, so the whole sugar thing doesn't work beyond a certain point.

This  morning, I froze 2 bags of our Swiss Chard and 2 bags of Harmony Valley Farm's spinach. If you haven't ever frozen greens before, it's super easy and well worth your time. Simply rinse the greens, chop them to desired size, and put them in boiling water for 2-3 minutes. Then, put them into an ice bath to stop the cooking process, dry them (in salad spinner or by squeezing and draining), and then bag them up. I find we actually eat more greens in the winter because taking them out of the freezer and heating them up or adding them to a soup or casserole is so quick! 

I also stuck a bunch of dry curly kale into bags. No need to blanch! Kale crumbles are the perfect easy addition to winter dishes.
Nutrition for the winter

And now, we're off to the garden. Happy Fall!


Sunday, September 18, 2011

A Produce Plus Weekend: Sweet Peppers, Edamames, and Cucumbers


We spent the better part of our weekend in the kitchen. But, as I've written before, spending time in the kitchen with a large glass of wine and some good tunes with the one I love is a beautiful thing. So, what did we make? Well...

On Friday, Andy brought home a large pail of cucumbers from his colleague. What a generous lady! We decided to make those in the crock like we did earlier this year. The recipe for that is here. Our first batch is in the fridge, and the pickles are wonderfully crunchy. So, we figured why veer away from a good recipe? (Well, other than the fact that our fridge is very near capacity...we really need a second one to store all of this live food we've been creating.)

On Saturday morning, we picked up 5 pounds of mini sweet peppers and 10 pounds of edamame from the Harmony Valley Farm stand at the Farmers' Market. Juan happily handed us our boxes in return for our check. We love produce plus opportunities ~ they always lend themselves to weekends in the kitchen, preserving up food for the winter, but we are relishing the day when our gardening skills are so fierce that we won't even be tempted to order and pay for produce plus. We look forward to the day when we're swimming in tons of tomatoes and crowded out of the house by piles of edamames and peppers. But until then, produce plus is a perfect way to support a local, sustainable grower, while making an effort to eat  both seasonally and locally.

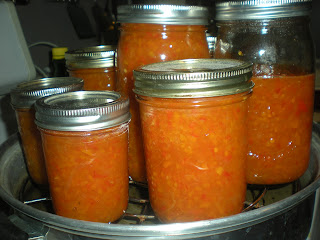
Funny thing about this week's produce plus pepper purchase is that we had no idea what we'd do with the sweet peppers once we got them. When we received the email that for the first time ever, these mini bursts of goodness were for sale in huge increments, we leaped at the chance. We began receiving these in our box about two years ago, and since then, they're one item we can't seem to tire of. As the summer winds down, at least there are mini-sweet peppers!. Honestly, they are mouth-poppingly delicious. Andy and I both eat them raw, plain or stuffed with cheese. So, what to do with 5 lbs of them? We tossed around roasting and freezing some, just freezing others, pickling them, making them into jelly, or even candying them. But then, this week's CSA newsletter featured mini sweets and provided a recipe for sweet pepper marmalade, and we were sold on that idea. The cans of red, yellow, and orange sweetness are gorgeous, and we're looking forward to sharing some over the holidays. The newsletter suggested serving with pretzels or crackers and cream cheese or goat cheese. Don't those ideas sound absolutely delicious?

...oh...and about that gardening goal, we saved a ton of sweet pepper seeds.

And, as for the ten pounds of edamame, simple! We blanched them (in shells) for three minutes, put them in a water bath, divided them up into freezer bags (2 cups per bag) and froze them. How great will an edamame salad be in the middle of a Wisconsin winter? So good. I'm already planning out my day of "summer eating" on a negative degree day: frozen watermelon juice-vodka drinks, edamame salad, and grilled veggie burgers perhaps?  I think I need to start getting bikini-ready for that fun day inside the confines of my cozy home now.

Here is the recipe we used (courtesy of Harmony Valley Farm) for the pepper marmalade:

1 cup sweet peppers, small dice
1 cup onion, small dice
1 cup sugar
1/3 cup white distilled vinegar
1/3 cup apple cider vinegar
1/4-1/2 tsp chili flake

Combine all ingredients in a medium saute pan.

Simmer over medium heat for 5 minutes. Reduce heat and simmer another 20 minutes or until liquid is syrupy. You can store in the fridge for several weeks or can and process 10 minutes in a hot water bath.


Our weekend totals are:
1 crock full of pickles
approx. 6 pints of sweet pepper marmalade (1/2 quart for the fridge)
17 frozen cups of edamame


Monday, September 5, 2011

Tomato Flops: Perfect for Pizza

We are in love with our dehydrator. Slice produce up, season it (or not), and place it all on trays. Turn the dehydrator on, slide the trays in, and forget about it. Half a day later, poof! Dehydrated, preserved garden goodies.

One example is what we call Tomato Flops. We got this idea from The Genius: Mrs. Barbara Kingsolver's book Animal, Vegetable, Miracle, but have adapted it over the past few years to our own liking. These flops are stupendous on pizza in the winter. They pop like little bursts of summer in your mouth!

Here's how we made ours:

Ingredients:
Roma Tomatoes
Dried Italian herbs (Oregano, Basil, Parsley, Savory, Thyme, etc...)
Garlic (if desired)

Process:
1. Slice Roma tomatoes in half. 
2. Sprinkle with desired amount of herbs. Top with a very thin slice of garlic, if you enjoy that sort of thing. We did one tray with garlic and herbs, but the rest were just covered with herbs.
3. Dehydrate until desired consistency. We recommend not completely dehydrating them. We let ours go about 12 hours.
4. Since we don't dry them completely, we freeze them in bags for winter use.

Last weekend, we froze 10 bags, with a dozen flops each. They're piled in the freezer, waiting to bring us a bit of sunshine in the middle of our Wisconsin Winter.

Before

After

Sunday, August 28, 2011

Livin' in the Kitch'n

The end of August=bustle, bustle, bustle. Of course, the garden is at its peak right when work is at its most stressful time, right?  Luckily for me, I feel comfortable and happy, alongside my cooking partner/husband in a hot, steamy kitchen with loads of bubbling pots, a whistling water canner, the smell of vinegar and vegetables, and pets running rampant.

Last Saturday, we made pizza sauce. We loved the recipe we used from Barbara Kingsolver's Animal, Vegetable, Miracle so much last year that we used it again this year. We cooked down 25 lbs. of Roma tomatoes and ended up with 10 pints of pizza sauce. Our only change to last year's process is that we used a bit less cinnamon, and we cooked it down a bit more, so we ended up with less pints, but thicker sauce.

Also, we processed  25 lbs. of Romas into 8 quarts of canned diced tomatoes. These are spectacular to have in the pantry for everything from spaghetti to soups to pizzas in the fall and winter. Last year's lasted us through this May. We'll have to can more to make that happen again this year. 

And, we have more cabbage fermenting right now. This time, the crock is full! I think we'll be kraut-ready this fall and winter. Bring on the Ruebens and Ritz crackers!

Plus, the freezer is receiving the fruits of our labor. This week, I froze carrots, celery, and green peppers.

Tomorrow is beet day!  Stay tuned...

Tuesday, August 31, 2010

Pizza and a Good Book


We had to let this cook down for hours and hours. 
For years, we've been searching to find a thick, flavorful pizza sauce to make and to can. Lo' and behold if my favorite author didn't include the very recipe in her book, Animal, Vegetable, Miracle. Throughout the book, Barbara Kingsolver's family writes personal narratives about food, and so this pizza sauce recipe actually comes from Camille, her oldest daughter. She shared the family's secret recipe in a chapter entitled, Living In a Red State ~ both to imply the political leanings of Kentucky at the time and the fact that they harvested nearly a ton of tomatoes the summer about which they wrote the book.


Anyway, our tomato crop has been hit or miss this year, so we ended up purchasing two 25 lbs boxes from our CSA farm, Harmony Valley. Combined with our own tomato crops, we have put quite a lot of work in . . . and we have quite a lot of work ahead of us.

On Sunday evening, we prepared the sauce, using some of our tomatoes and one of the boxes. The house smelled great, our cats acted as if they were about to die from heat stroke (see photo of Tucker to the right), and we ended up with 5 pints and 9 half-pints of pizza sauce. Between those and our freezer pesto, I think Andy's pizza addiction should be covered throughout the winter and spring.                        


Here's the amazing recipe, Family Secret Tomato Sauce, from the book, Animal, Vegetable, Miracle.

Our assembly line. L to R: boiling for 2-3 seconds, ice bath, and then skinning/de-seeding.


Look at all of those onions!


Thursday, August 19, 2010

What to do with all of those tomatoes? Can 'em!

Tomatoes chilling in an ice bath.
Canning can be a looming task to food preservation/gardening newbies. This blog entry is to reassure those of you nervous ladies and gents out there that it really is quite a simple process that's well worth the effort.

The first food that we ever canned was a batch of diced tomatoes. So versatile, we used them in winter spaghetti dishes, as pizza toppings, and in soups. Since year one, they've been a staple item in our pantry.


Ingredients:
Tomatoes
Lemon Juice
Salt (optional)
Sugar (optional)

Instructions:

1. Sterilize quart jars and lids by placing them in boiling water for 1-2 minutes. Or if your dish washer has a sterilize cycle, use that.

2. Prepare tomatoes for processing. Cut an X onto the bottom of the fruit. This will help make peeling super easy.

3. Prepare an ice bath. We usually fill our sink with cold water and ice, but a large pot or bowl works too. 

4. Boil water on the stove. Put the fruit into the boiling water for a few seconds (and no longer than a minute) to loosen the skin. When you see the skin split and loosen, remove the tomatoes.

5. Immediately after removing from the boiling water, put the fruit into the ice bath.

6. Take the fruit out of the ice bath. The skin should slip right off  (I like to save the skins for the freezer to make broth later and/or to give the warm tomato skins to my chickens.)

7.If desired, remove the guts from the center. Simply cut the tomato lengthwise, and with your fingers or a spoon, remove the seeds and pulp from the center.

8. Dice the fruit to desired size.

9. To ensure non-spoilage, add 2 Tbs. of lemon juice to each quart jar. Sometimes, we add sugar to make sure that the tomatoes don't have a lemony flavor. If desired, add a pinch of salt here.

10.Pack the jars with the fruit, leaving 1/2-inch head space at the top of the jars. Be sure that the jar lids are dry to ensure a tight, secure seal.

11. Process using a water bath or a steam canner.

 If doing pints, process for 40 minutes. If doing quarts, process for 45 minutes. Specific times are below (taken from: source):
Recommended process time for Crushed Tomatoes in a boiling-water canner.
Process Time at Altitudes of
Style of Pack Jar Size 0 - 1,000 ft 1,001 - 3,000 ft 3,001 - 6,000 ft Above 6,000 ft
Hot Pints 35 min 40 45 50
Quarts 45 50 55 60

For you novice canners, a word of caution: canning is touchy. You have to follow a recipe exactly to avoid potential spoilage. Read the directions for your specific canner, and cross-check other sources for processing times to ensure a good, healthy, safe, product. We like: www.pickyourown.org.

With that said, please do can! It's a wonderful way to preserve farm-fresh produce for the fall, winter, and early spring months. Nature has seasons. Here, in Wisconsin, we're not meant to go to the store in December and find red, ripe tomatoes. It's not possible to grow them anywhere around here at that time. Duh, right?

One way to embrace the seasons (and avoid blindly trekking food across the country or world via excess petroleum, while dishing out money to Dole fruits or some other big name) is by eating fresh, yummy tomatoes in the summer, and then embracing in the delight and beauty of your Ball jar filled with prepared tomatoes in the winter. It's amazing how great both can taste when you give yourself time to miss them. Plus, you'd be amazed as to how beautiful a pantry full of a variety of canned food looks.