Pin It

Monday, November 8, 2010

A Cheesy Week: Cheese and Broccoli Soup

We're really into cheese this week, I guess. Our last post was about homemade Mac 'n' Cheese, and now the very next day, I'm writing about Cheese and Broccoli Soup. Not good for the waistline, I suppose, but super comforting as Daylight Savings Time has ended and the cold temperatures are lurking.

Our Harmony Valley cheese share is biweekly for much of the year, but as vegetable peak season closes, our CSA schedule fluctuates, so we received cheese two weeks in a row.  Another reason for the increase in creamy, gooey, cheesy recipes.

This soup is another from Vegetable Soups from Deborah Madison's Kitchen. I have to say that the finished product was the best Cheese and Broccoli soup I've ever had.

Ingredients:
1 1/2 pounds broccoli
sea salt and ground pepper
3 Tbs. butter
1 onion
1 celery stalk
1/2 pound of diced potatoes, peeled unless organic 
1 garlic clove
1/8 tsp. cayenne pepper
1 tsp. marjoram, 1 bay leaf, 1 pinch of dried thyme
1 Tbs. flour
1/2 cup cup cream
2 tsp. Dijon-style mustard
2 cups grated cheddar cheese
rye or whole wheat bread, toasted

Instructions:
1. Chop the broccoli trees. Cook the florets in boiling water for about 3 minutes. Drain and reserve the liquid. Rinse broccoli  florets under cool water and set aside.
2. Melt the butter in a soup pot. Add onion, potato, celery, broccoli stems, garlic, herbs, and cayenne pepper. Cook over medium-high heat for about five minutes, stirring occasionally. Add 1/2 tsp. salt, flour, and 3 cups of reserved water from the broccoli (saving any extra). Bring to a boil, lower the heat, and simmer, covered, until the potato is tender (about 10-12 minutes). Add cream and/or additional broccoli water to thin the soup. During the last few minutes, add the florets.
3. Remove the bay leaf, puree the soup, and return it to the pot. Stir in the mustard, and add pepper and salt to taste. Just before serving, add the cheese. Do not allow the cheese to boil.  Serve with toast.

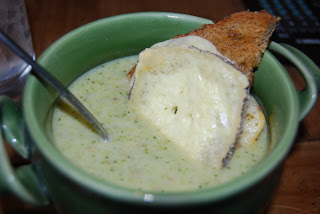
We melted a slice of mild sheep cheese on our toast...because we didn't think we had enough cheese yet this week! :)

Sunday, November 7, 2010

Creamy, Cheesy Goodness: Homemade Mac 'n' Cheese

Mac 'n' cheese with Sriracha Sauce
Mac 'n' cheese is one of those foods ~ everyone loves it, we all know it's not going to make us skinnier or provide us with any super-food vitamins, but we crave and devour it anyway. Making it from scratch can make it a bit healthier, maybe not less laden with calories, but with less chemicals and more nutrients than the box brands at the store.

Andy created his own special version yesterday. It's creamy, cheesy, and there are even some greens included to make us feel good about ourselves. His claims for this recipe are that most of the ingredients are flexible and that this could be created in an endless amount of ways.

I personally liked how this specific combination tasted, which is why I'm excited to be encapsulating the recipe onto this blog for future reference.

Mac 'n' Cheese:
Ingredients:
1 lb. of shell pasta
1/2 cup of flour
1 onion
2 cloves of garlic
1/2 cup of butter
3 cups of vegetable broth (or chicken broth if you so desire)
1.5 cups of 2% milk
2 cups shredded sharp cheddar
1 bunch of chopped yukina savoy (or other green)
1 cup bread crumbs
cayenne pepper, salt, and pepper to taste

Instructions:
1. Cook the pasta al dente.
2. Drain the pasta, run under cool water, and save until later.
3. In a saucepan, melt butter. Add chopped onion and garlic. Cook until onion is translucent (3-5  minutes).
4. Add flour, a few spoons at a time, to make a roux.
5. Add broth until mixture becomes smooth and creamy.
6. Simmer for a few minutes.
7.Slowly add milk and cheese. Stir and cook until cheese is melted, but not boiling.
8. Stir in pasta and greens. Add cayenne pepper, salt, and black pepper, if desired.
9. Put mixture into 13x9 baking dish. Cover with breadcrumbs.
10. Cook at 350 for 5-10 minutes, until breadcrumbs appear toasted.

Serve! This also would freeze well for later use. 

Friday, October 29, 2010

Roasted Red Pepper Hummus

We dug into the freezer for roasted red peppers for the first time this year today. We have plenty of fresh vegetables (carrots, radishes, broccoli, baby turnips, and cauliflower) that need to be eaten ASAP. The perfect fix? A yummy bowl of roasted red pepper hummus!
     I got the basis for this recipe from a cookbook that I bought in Ireland a few years back entitled The Irish Farmers' Market Cookbook. Ireland and hummus? Yes! The book is written by Clodagh McKenna, who lives by and cooks with a locavore philosophy. I'm smitten with the book's colorful photos, with its recipes' usage of local Irish ingredients (most of which are plentiful here in WISCO as well), and with its occasional difference in food vocabulary (croquettes for cucumbers, for example).

My version of this recipe:
2 roasted red peppers
25 oz. of garbanzo beans (I used canned this time.)
4 fl. oz. of olive oil
1 Tbs of tahini (optional)
4 garlic cloves
4 Tbs. of lemon juice
salt and pepper to taste

1. Put the garlic cloves and the roasted red peppers in your food processor. Process until finely chopped.
2. Add the chickpeas. Process until well-blended.
3. Add the lemon juice and tahini.
4. Add the olive oil, a little at a time, until desired consistency.
5. Add salt and freshly ground pepper to taste.

Serve with fresh veggies, pita chips, crackers, or bread.

Sunday, October 24, 2010

Therapy in the Kitchen: Squash and Pear Soup, plus Plout-Apple Crisp


Life has been a roller coaster lately, and so dining out has been plentiful as have homemade goodies baked for us by our friends. Today we realized our refrigerator was busting with food, ready to vomit out bags of veggies and fruit at its first opening. Our little feather-footed Bantam, Ani, died this morning, and so, we decided to go to therapy ~ cooking together, side-by-side, in perfect matrimonial harmony in the kitchen, whipping up soup for the freezer, applesauce for later this winter, and freezing veggies we realized we wouldn't get to eating fresh this week. Oh - and we added to our dessert collection ~ a fresh pluot and apple crisp.

Below, I have included the recipes for a Squash Pear Soup and our Pluot and Apple Crisp. 

Squash Pear Soup
 (we have adapted this from Deborah Madison's recipe in Vegetable Soups from Deborah Madison's Kitchen.)

Ingredients:
5 cups of squash
5 pears
3 Tbs. of butter
10 cups of vegetable stock
1 medium onion
1/2 cup of good, white wine
2 inches of ginger, grated
a generous pinch of cinnamon

1. Cut the squash in half. Remove and save the seeds and guts.  Roast the halved squash and peeled pears at 425 degrees on a baking dish or roasting pan. If squash are dry, add a bit of water to the pan. Brush with oil and season with salt. Bake for about 1 hour. You may have to turn the pieces over once or twice.
2. Once the squash is roasted, scrape off the skin and add it to saved seeds and guts.Also, reserve the liquid in the roasting pan.
Making stock
3. To make a stock, bring the 10 cups of water to a boil. Add the seeds, guts, and skin. Add the ginger and a 1/2 teaspoon of salt. Bring to a boil, lower to a simmer, and cover for 20 to 25 minutes. Strain and save liquid.
4. Then, melt the butter in your soup pot. Add the onion and saute over medium-low for about 10 minutes. Add the pears, squash, stock, and the reserved liquid from the roasting pan. Bring to a boil and then lower the heat and simmer for 25 minutes. Puree all when finished.

We froze ours, but it's delicious right off the stove as well!

Nutrition Facts
cup servings
Squash and pear soup
Serving Size: 1 serving
Amount Per Serving
Calories111
Total Fat2.9g
      Saturated Fat1.4g
      Trans Fat0g
Cholesterol7mg
Sodium136mg
Carbohydrate20.4g
      Dietary Fiber4.2g
      Sugars9.8g
Protein0.9g
Alcohol0.9g
Vitamin A 121%Vitamin C 27%
Calcium    6%Iron 5%
__________________________________
Plout and Apple Crisp
Ingredients:
4 apples, sliced
8 pluots, diced
6 Tbs. brown sugar
3/4 cups flour
1 tsp cinnamon
4 Tbs. oats
4 Tbs. coconut (optional)
6 Tbs. butter
1/3 cup brown sugar

Directions:
1.  Put the apples and 1/2 of the sugar in a saucepan. Cook over medium heat for 10 minutes or until apples are soft.
2. Put the pluots in the baking dish. Then, add the apples.
3. Combine the flour, cinnamon, oats, butter, and the rest of the sugar. Blend until the mixture is crumbly.
4. Put the mixture over the apples. Then, sprinkle the brown sugar and coconut on top.
5. Bake at 400 degrees for approximately 30 minutes. To be safe, put the baking dish on top of foil or a cookie sheet in case the fruit spills over.

Oh~ and no fall-cooking day would be complete without applesauce! We froze a few bags of that too!
Ready to cook down.

Glorious Garlic: Planting 2010

On the 20th, Andy tilled up our "dump garden". Our future plans for this plot of yard involve lots and lots of garlic. For the past two years, we planted these vampire-repelling bulbs in our large garden, so it's time to rotate crops. Plus, the dump garden is always open for whatever we feel needs to be there. This is an experiment in some ways because the soil in the dump garden is not garlic-friendly. It is a bit rocky, and typically, garlic grows best in rockless soil. Year by year, we're trying to get the soil in the dump garden to be more fertile and more garden-friendly.

Garlic is a pretty amazing herb (yes, it's an herb! Who knew!?). Most know it is an antioxidant, but it also boosts the immune system, lowers blood pressure, stabilizes blood sugar levels, and helps prevent ulcers. It is rich in, "Calcium, folate, iron, magnesium, manganese, phosphorus, potassium, selenium, vitamin B-1, vitamin B-2, vitamin B-3, vitamin C, and zinc" (source). 


This year, we planted 45 cloves, which we had collected from Farmers' Markets and from our own garden. We chose large cloves because those will produce the biggest heads and the biggest cloves next year. We use garlic in nearly every dish, and peeling tiny ones can be so tedious. I love me some big cloves. This is our fourth year planting garlic, so we're feeling pretty good about the process: till up the soil, plant them 1-2 inches deep and 4-6 inches apart, cover with 3-5 inches of mulch (leaves, hay, grass clippings), and wait for the spring to see tiny little green shoots.

The hope is that the leaves we used as mulch will help to condition the soil for future years. We meant to add compost to the soil, but Andy was too far into his element to remember. Oops! I guess this will be our variable year to see if the compost ever made a difference...although, I suppose we switched garden locations, so there are quite a few variables this year! An added excitement to our new planting is that garlic can keep away various insects, such as Japanese beetles, snails, root maggots, carrot root flies, and codling moths (source). Last year, we had an infestation of insects up at the dump garden, so we'll see if the garlic can meet expectations.

Here are some pics from Garlic Planting 2010:

Sunday, October 10, 2010

Graze Resturant: A Pub Serving Local Food, Oh My!

This is my "official" review of Graze Restaurant in Madison: We ate there last night after seeing WICKED at the Overture Center.
______________________________

Madison jumped on the local food movement long ago, but to my knowledge Graze is the first pub that serves all locally grown food (except for the oysters which are from Maine and various fish, including a "Sustainable Catch"). According to their website,

          "The idea for Graze came from Chef Tory’s love of comfort foods. Inspired by the New York  gastropub scene, the menus feature a range of classics executed on a higher level than traditional pub food. We chose the name Graze because grass-fed animals and rotational grazing are important to us. Also, we want the menu to inspire our guests to do just that: graze. There’ll always be a variety of dishes and small plates to choose from – the kind of stuff chefs and foodies love to eat."

The atmosphere is hip, very minimalist and roomy. Andy and I got there around 5, when it opens to serve dinner, on a Saturday evening. We had no problem getting a seat, though by the time we left, the place was pretty full.

On the menu, there is an array of elegantly simple starters and sharers including such comfort foods as a plate of various local pickles, a homemade dish of mac 'n' cheese to share, roasted bone marrow, and a plate of meat and cheese with soft bread. The back of the menu lists the local farms from which each food comes. We opted for the Sassy Cow Cheese Curds, which were the best cheese curds either of us has ever consumed!

Dinner entrees are again, simple in nature, but exquisitely prepared. My husband had a burger made with locally-sourced meat. His side of french fries tasted like a delicacy. Not greasy, just yummy. I had a beet salad, which was delicate and delicious.

The drinks were also, for the most part, local. The beer list was comprised of Wisconsin Brews; they even had a locally-made cider. Plus, they have a unique and fun house cocktail list, including a personal favorite made of gin, orange juice, and a splash of Cabernet.

My only criticism of the restaurant was the lack of vegetarian items. There were a few; it was not difficult for me to find something to eat, but there are so many local CSAs producing great produce - I was hoping to see more of them featured in dishes, rather than as sidekicks to meat.

With that said, we'll be back. I'll have my salad and eat it too. :)

Monday, October 4, 2010

Farm Aid: A Musical Celebration of Farm-Fresh Food

On Saturday, October 1st, we spent the day at Miller Park for the 25th  Anniversary Farm Aid Concert. According to Farm Aid's official website, over the years, "Farm Aid has raised more than $37 million to promote a strong and resilient family farm system of agriculture." The non-profit works to keep family farms on their land and to raise an awareness of the loss of family farms as corporations get larger and larger.
A few super cool aspects of Farm Aid in comparison to other concerts:
1. Throughout the day, there is a Homegrown Village which hosts a number of local farmers, organizations involved in the local food movement, and CSAs. Will Allen was there in the Growing Power stand, but we missed seeing him by minutes.

2. The concessions serve local and organic food instead of the usual chemical-laden, mysterious-origin, regular junk. There were veggie hot dogs, local brats, local burgers, and so on. Even the french fries were local and organic. They were serving popped sorghum too!
3. All day long, musicians talk about food issues! Music and like-minded musicians and fans: what could be better?

We were very close, so yes, these are our actual pictures of the day. Here are some of our highlights:
Willie Nelson and Amos Lee
Band of Horses
Jason Mraz ~ Andy took this one for his co-worker, who is a HUGE fan (wink).
Jeff Tweedy of Wilco
Tim Reynolds and Dave Matthews
Neil Young
Norah Jones
A screen shot of John Mellencamp and Dave singing "Homegrown" - Willie Nelson and Neil Young were also a party of the song. 

Farm Aid was better than we anticipated! It was a celebration of farmers and local eating, but also a call to action for change. Farmers are losing their land every day (as many of the musicians noted). It's important, as Neil Young said a number of times to "Read the Label!" Know where your food comes from. Be sure you're eating foods that come directly from nature and from the United States. Large corporations are exploiting the land, the workers, animals, and us, the consumers. Eating locally is more compassionate and kind. This event reinforced all of these principles. We're so glad we went, and we're hoping it's close next year.