Pin It

Monday, August 29, 2011

Carrots: Spicy Pickles, Pesto, and More

Carrots test our patience as gardeners. Their germination time is long, and weeding them is a pain! I can never tell what's a carrot and what's a weed at the start of the season. But then, the parsley-like leaves begin to develop, and these sweet, orange Popsicle-like roots take form under ground. Once the foliage begins to identify itself, I feel I'm golden. All I have to do is wait a good 2-3 months, and soon, I am digging up loads of carrots.

This year, we had our first successful crop of Danvers Carrots. We planted them in a raised bed which helped tremendously in terms of weed control. To get them out of the ground without breaking them, we saturated the dirt around them with water and pried them up with a shovel.  We harvested about 5 lbs. Then, the question was: what should we do with all of them? We also had another pound from my parents' and our CSA boxes.

We thought about juicing them...but then realized how quickly said juice would be consumed in comparison to the amount of patience exuded to grow and harvest them. We thought about pickling them all, but realized we still had 1.5 jars from last year's canning season. So, we decided to pickle most and freeze some. We also used the greens to make carrot-top pesto.

In the end, we canned four quarts and froze three quarts. We used the same recipe that we used last year, except that instead of guallijo peppers, we used chipotles and dried super hots. And again, we sliced them into rounds versus into spears.
 We also froze four bags (2/3 cup each) of carrot-top pesto. Apparently, carrot tops have a ton of Vitamin K and chlorophyll~ much more than carrots themselves. People drink carrot top tea (sweetened with honey) as a way to quickly get all the nutrients. We thought about drying ours for tea, but decided we'd probably be more likely to eat them up if they were on pizza ~ hence, carrot top pesto.

Use all in varying amounts to your taste (and freeze for the winter, if you'd like!):
Carrot tops (chopped)
garlic
walnuts or pine nuts
Parmesan cheese
salt and pepper
honey
olive oil

Put in a food processor and mix to desired consistency. It's that simple.

Sunday, August 28, 2011

Livin' in the Kitch'n

The end of August=bustle, bustle, bustle. Of course, the garden is at its peak right when work is at its most stressful time, right?  Luckily for me, I feel comfortable and happy, alongside my cooking partner/husband in a hot, steamy kitchen with loads of bubbling pots, a whistling water canner, the smell of vinegar and vegetables, and pets running rampant.

Last Saturday, we made pizza sauce. We loved the recipe we used from Barbara Kingsolver's Animal, Vegetable, Miracle so much last year that we used it again this year. We cooked down 25 lbs. of Roma tomatoes and ended up with 10 pints of pizza sauce. Our only change to last year's process is that we used a bit less cinnamon, and we cooked it down a bit more, so we ended up with less pints, but thicker sauce.

Also, we processed  25 lbs. of Romas into 8 quarts of canned diced tomatoes. These are spectacular to have in the pantry for everything from spaghetti to soups to pizzas in the fall and winter. Last year's lasted us through this May. We'll have to can more to make that happen again this year. 

And, we have more cabbage fermenting right now. This time, the crock is full! I think we'll be kraut-ready this fall and winter. Bring on the Ruebens and Ritz crackers!

Plus, the freezer is receiving the fruits of our labor. This week, I froze carrots, celery, and green peppers.

Tomorrow is beet day!  Stay tuned...

Striped Cavern Tomatoes: The Perfect Stuffers

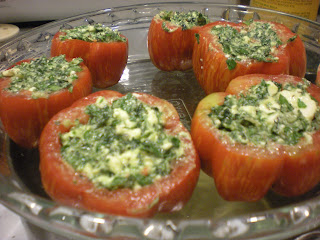
 Ever heard of a striped cavern tomato? If you haven't had one, I advise you to add a pack of seeds to your idealized 2012 garden now! These , in fact,are  the perfect stuffing tomato. Plus, they will keep in  your fridge for up to 4 weeks after picking.

The texture and shape of a striped cavern are reminiscent of a bell pepper. The inside is nearly hollow with very few seeds, and the outside walls are sturdy. We grow 1-2 plants a year - the plants are consistent producers, so 1-2 provide/s us with plenty of grilling/stuffing opportunities. Any extra we add to our canning pile as they work well for diced tomatoes too.

Last week, we received Butler Farms Feta Cheese in Sunflower Oil in our CSA Cheese Share. Honestly, this cheese is beyond delicious. The sunflower oil adds an indescribable flavor. Usually, I simply put the tub of cheese with its oils and herbs over a salad, but this time, I combined it with freshly cut Swiss chard and stuffed spoonfuls into our striped caverns. We got the charcoal grill ready and had a glass (or two!) of chardonnay while we waited.

The result was amazing. The tomatoes' walls held the cheese so well that we used steak knives to cut into them. I can hardly wait until this harmony of flavors is available again!

Sunday, August 14, 2011

Wild Fermentation: Sauerkraut and Sour Pickles

As of August 8th, five quarts of sauerkraut have been residing in our fridge.That makes us so happy! Did you know that members of the Brassicaceae family like cabbage, brussel sprouts, and kale are cancer-fighting? Further, a study in Finland found that fermented cabbage may be even better at warding off cancer. We decided against process-canning the sauerkraut because in processing, many of the beneficial live bacteria are killed, and we're planning to regularly eat sauerkraut for pleasure and for health benefits, so the jars won't have to time to go bad.

While we wait for the next round of cabbage to be ready, we're utilizing the crock to make sour pickles. Just like I mentioned that I had nostalgia when it comes to sauerkraut, we've found pickles create that feeling in many people we know. When we mentioned that we had a crock, Andy's dad recalled that as a child he often ate crispy pickles straight from the crock. He explained that the cucumbers were placed with grape leaves whose tannins held the crispiness. Shortly after that conversation, I told my parents what Andy's parents had said. My dad's face lit up, and he said he had the same pickle experience growing up on the family farm with his parents. So, we decided to consult one of the Backyard Market Bibles ~ our copy of Wild Fermentation. Sure enough, in both the book and on the website, we found explicit directions for "Sour Pickles."

Check out the Wild Fermentation book or website for the specifics or here are our easy directions:
 Ingredients:
3-4 heads of garlic
2 or more hot peppers
handful of grape leaves
pinch of peppercorns
3 to 4 flowering heads of dill
3-4 pounds of small- to medium-sized cucumbers
1/2 gallon of water
6 Tbs of salt

Equipment:
crock
plate
weight (we used a gallon of vinegar as a weight)
towel

1. The bottom of the crock will contain all of the grape leaves, garlic, peppercorns, pepper, and dill. So, put desired amount of each in.

2. Then, add cucumbers.

3. Mix salt and water together, making sure the salt dissolves. Pour onto the cucumber mixture.
4. Make sure the brine covers the cucumbers. If not, add more. General rule of thumb is 1 Tbs. of salt per cup of water.
5. Place the plate on top of the pickles. Put the weight on top of the plate. Cover with a towel.
6. Check daily. Depending on temperature, pickles are ready in 1-4 weeks. We started tasting ours when the color faded. We've been enjoying them ever since.

Today, we noticed our brine has started going cloudy. That means, it's time to put them into sterile jars.

So...

7. Sterilize jars.
8. Drain pickles, reserving the brine.
9. Boil the brine. Let it cool.
10. In the jars, put fresh spices and the pickles.
11. Pour the cooled brine over the pickles.

12. Refrigerate.

They should keep for a few months. With all this live food in our fridge, we're going to need to get a new one soon to make room for everything else!


Sunday, August 7, 2011

When the Parents are Away, the Kids (Hens) Will Lay

We spent the weekend with family at a cabin which sits by a pristine lake. When we arrived home this afternoon, we found two beautiful brown surprises. Sadie, our barred rock, 5-month-old hen laid her first two eggs!
Sadie, today's star!
Right now, her eggs are as small as Janis' eggs. Janis is our Polish bantam. We anticipate that the size of Sadie's eggs will bypass Janis' by the end of the month.
In order: Janis', Sadie's, Sadie's, Spinderella's, Spinderella's
 In other news, the family of bunnies living by our raised beds are going to town on our tomatoes. We're all for sharing and happy co-existence ...but, come on! The tomatoes!?!?!  A fence is going up tomorrow.

In the meantime, the chickens are happily reaping the benefits of those pesky rabbits.

The chickens enjoying the aftermath of the rabbits' feast.


Rocky crowing in delight.